Thursday, January 12, 2012

Obtainium: terrain edition


obtainium (noun)
1. any item, found or obtained for free.
2. materials used to create art work such as assemblage, mixed media or sculpture that wasn't bought new, but obtained in other ways, such as second-hand, dumpster diving, chance findings or donations.


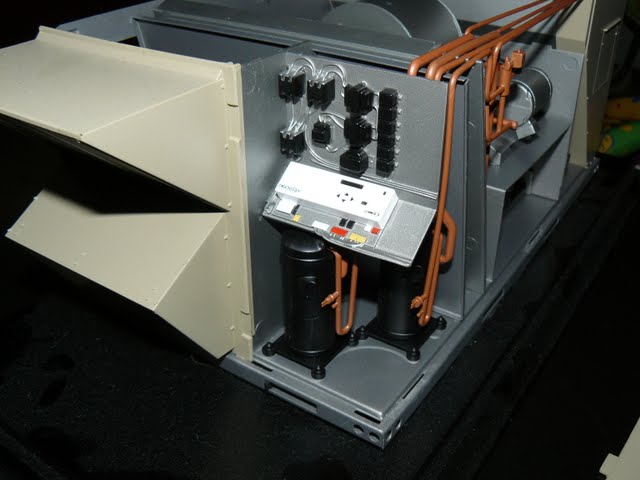
Building good terrain relies heavily on obtainium. In most cases it is found as raw materials like foamcore, craft sticks, etc. Other times it comes as finished products by companine like GW and Woodland Scenics. Sometime obtainium comes in even stranger forms. 


I got this from a vendor that sells industrial AC units. This is the perfect start to a 40k generator building. Scale wise it is just the right height, large enough to hide things behind but not so big as to dominate a table. The model comes appart you can see all the details. These kinds of models are great and strangly easy to get. Mine was a gift but if you talk to the people at your local heating/AC shop they usually have old models collecting dust that they are willing to part with. Other places to check are big box hardware stores. They get in alot demo/display models for sales that get thrown out after the sale is over. 


The parts are out there, you just need to obtain them.

Friday, December 30, 2011

Foam cutting table overview and possible redesign


A couple of years ago I posted a video on my YouTube channel of a foam cutting table I built for some terrain projects. The design is pretty simple and there is nothing hidden in it. You could probably build one from just the pictures but I figure any help I can give with the details may help if you want to build your own. It will also give me a chance to give some suggestions on making it better.

The parts list:

  • 1/2 inch wide aluminum bar stock
  • wood battens, I used some scraps of 1x2 but anything up to 2x4 will work. The small stuff is just easier to work with.
  • laminate topped wooden board, mine is a counter top off cut. An old laminate shelf at least 12 inches deep would also work.
  • wood screws
  • eyelet screws and bolts
  • bolt, wing nut and washer long enough to go through your choice of wood battens
  • 22 gauge wire
  • toggle switch, I used a paddle with an LED "on" light
  • 12v 1.3a power supply
  • nichrome wire, got this from Woodland Scenic. You can also used some types of guitar or piano wire. You just may need a beefier power supply


The design:
If you have ever seen a scroll saw the design will look familiar. You are building the same thing just replacing the saw blade with a piece of wire. The second difference is in the tilting mechanism. In a scroll saw the base tilts to allow for angled cuts. For the foam cutter version it is easier to tile the wire than the base so the arm is designed to pivot giving the same effect. Lastly the base size is larger. This makes it easier to get the piece flat against the table for better cuts or working with large pieces of foam. The arm the wire attaches to is made of aluminum. This material was chosen because it is easy to work with and springy. This last feature simplifies the design by not requiring any extra pieces or springs to keep tension on the wire.


The electronics:
To keep things simple the power supply is one of those generic "wall wart" dc power supplies. The one I used is a 1.3amp 12 volt unit. Mine came form an old answering machine or something like it. I never throw these things out because they always can be used for other purposes. If you don't have they can be found all over the web or at Radio Shack. Really though if you are going to buy one check eBay for tattoo power supplies. They are under $20 and work great. They also have variable output voltage so you can adjust the wire temperature and in some cases foot pedal on/off switches. This is really nice because it allows for hand free operation.

The wiring is a basic circuit. It is a simple on/off circuit. The diagram below has a couple of optional features. First the pilot light. This can be bought as an assembly, part of the switch as I did or even built manually. The second is the push button/foot switch. If you went with a tattoo power supply this wiring is already built into the power supply. Otherwise you will have to make the switch yourself. I am not going into that here because I don't want to turn this into an circuits 101 course.

The improvements:
The basic table I built has a few issues. It works great for freehand cuts but for precise cuts I need to add a rip fence like the one on a table saw. Make the arm height shorter, maybe 3 or 3.5 inches. This allows for less flex in the wire and gives a cleaner cut. Finally add a stop the arm pivot at 90 and 45 degrees. Getting square or repeatable cuts is a problem without this. The final thing is moving to a thicker gauge wire. This again pulls some of the flex out of the wire giving better cuts.

That is it. Get to building.


Tuesday, December 27, 2011

Boltgun in the paint booth, Bolt Pistol on the bench


Since I still have allot of foam core left, my first boltgun is painting booth and the Thunder Hammer build is stalled so I needed something else to keep me busy. So time to build a bolt pistol.

This started out from a paper template as opposed to me drawing my own. This has its ups and downs though. The advantage of having someone else do all the work gets stripped away when you translate that same design to foam core. I ended up with several templates that gave me the basic shape. I am still in the process of working out the handle design. I am stuck with either going with a carved foam/resin piece or sticking with the paper/foam core from the template.


Friday, December 23, 2011

The project that was - Shoulder pads


Sometimes project die for the strangest reasons. In this case it is due to my ineptitude with fiberglass. After 3 attempts I am rethinking this project and will have to take it into a different direction. Oh well, I at least still have the paper template to design the new ones off of. I think I am going to switch to a wooden form to lay the fiberglass against instead of doing a hollow paper form.


Wednesday, December 21, 2011

Book Review - Nocturne


'On the Anvil of War are the strong tempered and the weak made to perish, thus are men's souls tested as metal in the forge's fire.'


Nocturne is the final chapter in the Salamander trilogy and Nick saved the best for last. If you have been following along you remember the ending of the last book with Vulkan He'stan returning, Tsu Gan getting captured and Dak'ir's powers at question. This book answers the question of what happens next and goes even further. It is a true roller coaster ride. You have warp battles, planetary destruction, demonic possession, a trial and the Dark Mechanicus just to start things off.

This time out Kyme does a great job of pulling from all the other pieces of the series including the short stories and audio books. For example when they do the roll call for the dead before battle they mention one of the characters from  Fireborn. We also see the return of the child Bak'en saves in the Salamander book as a new scout going through the trials. This is a nice touch and goes a long way to leaving as few loose ends as possible.

One thing he does a little differently this time is he fleshes out characters that may have been missed or a little flat in previous books so you see them change over the roughly 3 or 5 years that pass from the beginning of the series. Unlike the Ultramarine series no character comes out of any of the books unchanged. Even the Salamader's famous pragmatism is tested against the anvil. In some cases even breaking the character under the  strain. This adds heavily to the body count but also shows how dire and bleak a world Nocturne is. It lives up to its death world status.

One return we see is the Marines Malevolent. Seeing how they crossed paths the first time it was unique to seen them again. Kyme really doesn't like loose ends. I wont spoil what happens with them but a little taste can't hurt.
' "What is the fate for the Marines Malevolent now?" he mused. "What fate for the dammed?" One of the wounded stirring caught Lorkar's attention. ... Lorkar leaned in close. "Tell me, brother. I will answer if I can." He heard the tension in a gun trigger being slowly squeezed and whet he realized what the wounded warrior was saying, knew his critical error.'


This is a section you will just have to read to get the full effect. Trust me you will like the outcome.


Over all the story holds up well and has enough twist and turns that had me not wanting to stop reading a few times. The big thing is everyone is expendable. None of the we need him later to push the story stuff. As I said the body count is high but with a purpose. Every death furthers the story or is used to end story line. It may be a little hard to follow if you missed the other 2 books because there is no back tracking about the characters. This is a solid ending to the series.

I give this one 5 drake heads out of 5! Read it and be tested at the Anvil.


Sunday, December 18, 2011

Fire on my mark! 3...2...1...


Progress is moving forward on my bolter project. I decided to simplify the handle and go with a flat one instead for a couple of reasons. First up, complexity. The original plan was to build it out of a block of foam but the strength just wasn't there and it would likely break before I got it mounted. The second was to build it up with several pieces of foam core then cover it with air hardening clay. Problem here is I am out of clay. Since this is more of a test build than a replica the flat handle will work out fine.

The project is now read to be gesso coated and lightly sanded. Once that is done the painting and final details can be added. I am still trying to decide what chapter to paint it for. Thinking about Salamanders, but the Soul Drinkers are really calling my name. Something about a chapter that split from the corrupt Empire and pulled itself back form the gates of Chaos to forge its own path seems like the perfect candidate.

Onward to the pictures.


LinkWithin

Related Posts with Thumbnails