 |
| I know it is a Bolter and not a Bolt Pistol, but it is a cool picture. |
Lets go over the different builds and the problems and pitfalls that got us to the final version. First up the materials shift from cardboard to acrylic. The original idea was to build the main body out of 1/8th inch thick hardboard. The same stuff you base terrain on. Turns out there is too much resin holding it together to even begin cutting with a 40 watt laser. After checking the Full Spectrum Engineering forum, it was confirmed that the stuff doesn't cut without burning. Those plans dashed I went back to the hardware store and picked up some 1/8th inch plywood. Same issue, too much glue. The stuff engraves beautifully but the glue between the layers is too tough to cut. Back to the forum where I found a suggestion of going to Woodcraft and picking up plywood there. Quick trip to Amazon and the web, wood was on its way.
While waiting I switch to the one material I knew would cut cleanly, acrylic. My local hardware store has it in several thicknesses and I was able to pick it up for a reasonable price. A couple of hours later and a few miss cuts I was done and got this.
 |
| Shown upside down because the handle is not attached. |
This is the first version and it was a great proof of concept. The thing looks good and will take paint with no really prep work required. The handle is not attached yet but it is a simple matter of epoxy and time. The downsides to this one is first cost. Acrylic is not cheap and would be great to use if I were using it as a casting base but I am not. Next is fragility, acrylic is not the most durable material and had a habit of fracturing if dropped. I can correct this by filling the thing with 5lb expanding foam but really this is more of a display piece. The last issue is weight. It is heavy. Noticeably so and adding anything to stiffen it will put more stress on the hand grip mount.
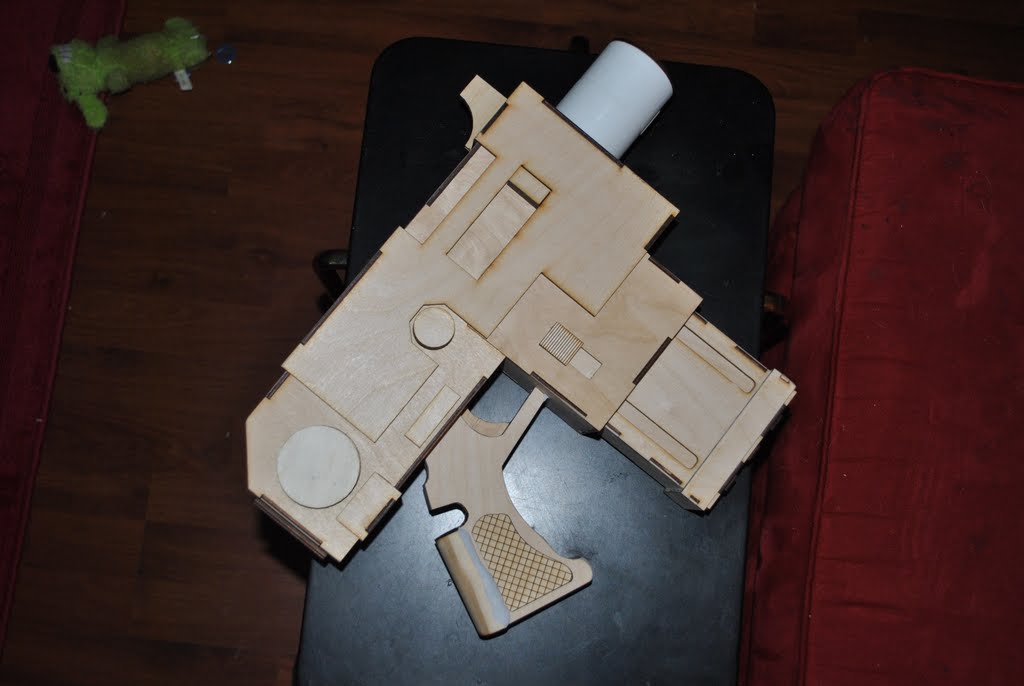
The wood arrived and cutting began. This stuff cuts as well as the acrylic and at lower power. I am using 25-35% speed and 40-50% power with little to no charring. I have found my new material of choice. The design didn't require any real changes from the transition to wood. There were a couple of shims I added to reinforce some of the joints but that was it.
 |
| Bolt Pistol v2 ready for primer and paint. |
But I did do some changes with the build. Lets start with the barrel. The original plan for the build was to just use a piece of PVC pipe but I found that a pair of couplers and some wooden rings to beef it out fit the bill nicely. Next up was the magazine change. The square magazine on the acrylic version was out of necessity. Bending acrylic is not easy and not something I didn't want to deal with that. Wood is easier to bend but again why bother when a straight magazine looks good. That is what I went to. But why not take it up a level if I am going that way and make the design one that will allow it to be removable. So that is what I did. a couple of quick changes and 3 sets of magazine miss cuts and I ended up with a simple workable magazine that can be magnetized and removed. The alignment worked great but I hit one snag, one of the spacers needed in the gun body was a little off and I couldn't slide the last one in. Mental note, add the shims and spacers before you close up the gun body. Since I wanted to get this one done, I just fixed mounted this one.
 |
| Removable magazine and grip design. |
The last little bits were the knobs and switches that I also laminated to get the correct thickness and a little filler putty to clean up some of the angled joints. That is it. Ready for the paint booth. Well almost. There were a few things I learned in the construction. First, Aleene's Original Tacky Glue is the best glue ever made for craft projects like this. It doesn't run and gives you plenty of wiggle room for alignment. Clamps, 4 and 6 inch bar clamps are a necessity. The more you have the easier things will be. Spring clamps help and having different sizes on hand is always good but the bar clamps really shine for not shifting the alignment of parts as you apply pressure. Sand all the parts first. This just common sense but it is easy to forget when you get into the heat of building. Lastly don't throw away any scraps. They come in handy. Anyway, enough talk more pictures.


How much would one cost?????? -Odin
ReplyDeleteContact me if you have any questions lathanm2501 at Gmail
ReplyDeleteLooking good. Any plans for the full size boltgun?
ReplyDeleteYes, the full size in on the drawing table now. It is in the 24-27 inch range long. Just need to get it dialed in. I should have it ready for testing in August. I am also building a Stormbolter.
DeleteSweet! :D I can't wait to see it.
Delete