Friday, April 30, 2010

Let it snow


Everyone has their own formula for making snow. Some are simple, sprinkle with talcum powder and others involve mixing ground crystals, flock and pixie dust it a 5 gallon bucket. The point being there is allot of room for other options. Here is mine.

The formula -
baking soda
white gesso
pva glue
snow flock

blue ink*

The snow mixture I use is a 2:2:1 mix of glue, white gesso, baking soda and just enough water to thin it out to a runny texture. Next drizzle it on the spots you want snow then cover it with either more baking soda or even better snow static grass. The more dry the base is before you shake off the excess the heavier the effect. So for a heavy snow wait until it is fully dry. Seal it with a matte varnish and the effect is done. I try and do batches of bases at a time to cut down on the amount of waste and so I don't have to deal with static grass getting into everything.

Thursday, April 29, 2010

Moldmaking project revisited

I finally got a chance to pick up some more mold making supplies so I can finish customizing my battlesuits. As much as I love my Tau, I really do not like the look of the current XV8 battlesuits. They are too boxy, top heavy and don't match anything else in the Tau universe. The Forgewold ones look great with curves and panel lines that flow like the rest of the army. The new XV9 pushes this even further. The look like they are ready to swoop in and move with lightning speed. If only they were in the current codex.

Several months ago I began redesigning my suits to look more like this.


This is a landmate from the Appleseed anima and they seemed like a pervect fit for Tau. Looks cool doesn't it. Sleek and nimble, even with its bulk. A fast moving, stealthy killer. So how do I get to this with the XV as a base, lots of green stuff and a big pile of stealth suit parts. Lets start with the legs. For the upper section I am using the top part of an stealth suit head to get the curved shape. The jets at the back will be the grenade launchers for pulse carbines. The lower leg and foot, more stealth parts. The torso will begin as a FW Broadside with larger shoulder joints and a stretched torso to make room for the second arms. The backpack and antenna will likely be a mix of burst cannon and heavy gun drone parts. The easiest part is the head. There are already plans for this floating around on ATT I just have to dig them up.

Since I need to build a few of these, something like a dozen, I am going to be making molds for this one. I will need a leg & arm mold, one for the new torso and pelvis, another for the backpack and lastly one for the head. So stay tuned to see the build and mold making process.

Now that I told you that I can tell you about what I was working on last night, making a parts mold for some new missile packs for my broadsides. This is another on of those parts that is a little plain that could use some sprucing up. For these I found a great looking Gundam pack that liks like it will work but has 1 problem. Getting enough to outfit a dozen or more suits. Resin to the rescue. So lat night I did the first mold of the unmodified part. This way I don't destroy my only one modifying it to fit the look I want.


Tuesday, April 27, 2010

First project - The fold away table


First project - The fold away table.

Everyone wants to have a table but lets face it building one can be a problem, especially if you are lousy at woodworking or don't own a truck. Well I have been working on a couple of ideas on how to get around this and came up with a couple of ideas. The rules for these table designs are simple 1) must be compact 2) all parts need to fit into a normal sized car 3) no power tools required to assemble and 4)easy on the wallet. It may sound like a tall order but I was able to come up with a design that can be built for around $100. Ready, set, GO!

The Design - Some Assembly Required Cutting Table.

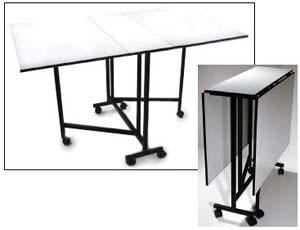
Here is our goal. This is a sewing table I picked up a year ago to use as a roll away modeling table. The design is prefect. Great height, takes up practically no space,is on wheels and lastly is wife friendly.

It is 13" x 36" x 36" when folded, 36" x 36" x 36" with 1 side up and expands to 36"x60"x36" fully setup.

This is 6" short on all for sides for an official game but if you want an instant table you are all set. For those wanting a full sized table keep reading.

The Parts Run - It will fit in the car

Parts List - Table Topper
3 2'x4' pieces of 1/4" either plywood or fiberboard
12 1"x2"x4' pieces of lumber
2 boxes of 5/8" long wood screws
1 box of 3/4" long wood screws
2 4' long piano hinges

I picked up all the pieces at my local hardware store for about $50. I went with fiberboard since it is a little more dense and has less tendency to warp. Yes I was able to fit both pieces in the trunk of a WRX so you don't need a truck to get them home. While you are there pick up a few more odds and ends you may need later like a big bottle of glue, some sand, foam, chainsaw and band aids.

The build - Tools are fun...and sharp

To make this table work we are going to create 3 frames and attach them together with the hinges. Now we have 2 options here, me continuing to type or going to pictures of the one I already built. Which way do think I am going.

The full project gallery


Friday, April 23, 2010

The fun begins

Well lets see, I have a Facebook page, a Youtube channel, 2 photo streams and my ancient personal website so what is left. Well you are reading it. This is pretty much a space for me to quickly update what I am doing as well as a place from me to vent about my hobbies and other things that are going on in my life. I am going to try and keep the venting to a minimum but I can't guarantee it. Anyway join me for what is definitely going to be a bumpy ride.

LinkWithin

Related Posts with Thumbnails