Tuesday, May 25, 2010

The final Punch In! - 40K Radio signing off.

As many of my fellow Freebootaz already know 40K Radio has decided to stop broadcasting after a troubled month and a half of real life effecting gaming. The details for those of us that were there to see the slide are not important at this point. Why look back and second guess when there is little you can do about it. Sure you can grouse and whine that this person failed or threw person x to the wolves or dreadsock person y but really who cares. That is the easy thing to do. I have never been one for the easy route. Life is hard, get used to it!

We move forward knowing that we were all witness to an amazing phenomenon. A podcast that went from nothing to rock star status in virtually no time. It had some of the best interviews, access to the industry and visual presence of any US based podcast. They raised the level of sound quality from the 99 cent tinny, dim sounding microphone in the basement to radio level. The live show production level was like a real radio show with clear segments and transitions. They tapped into that FM, talk radio feel better than anyone else. Guys thank you for proving that it can be done. From the live call in show to the podcast, a gaming tournament, Toys for Tots drive, marathon shows, UK specialty shows, after hours bar and even their own drink the show did it all. The only thing missing was their own minidex and that was hinted to early on in the show. Great work!!!

Now what? I chose the title picture for this post from the movie Pump Up the Volume! for a reason. Talk Hard! The movie ends with the lead character being taken off the air after telling his listeners to seize the air. Speak out, let your voice be heard, say what hasn't been said and keep going. This is then followed by dozens of different voices launching their own programs. That is what we are seeing now. There is already a group Freebootaz looking at doing this. I am one of them. Some of us will make it, some wont. But what is will do is keep the dream alive and further 40K.


Spencer, Scott, Chipley, Phil and Jar Jar, Thank you for showing me what is possible. It was a great ride and trust me it is not over, just switching tracks for a little while.

Punch In!


Sunday, May 23, 2010

Tau Special Character - Shas'Vre Valsk

WD288 had the character Kais (Shas'la Vior'la Kais) that had a modified rail rifle that was assault 2 instead of heavy. Sadly they didn't give him a point total but it wouldn't be too difficult as he isn't a command unit but and upgrade to that standard pathfinder with some small tweaks. What if we did the same thing for the Piranha:

The Pilots of the Kaior Sector are know for their unique looping fighting style and charged wind attacks that seems to allow them to pull of the most amazing assaults against armor. Shash'Vre Valsk created this style of flight to counter the constant wind and sand storms in the Kaior plains. Under his training other pilots have learned how to use the wind to increase their attacks range and strength of their weapons.

Valsk's Piranha - Valsk pilots a modified piranha that as been upgraded with fusion blaster twin burst cannon instead of the normal gun drones, target lock, multitracker,targeting array.

Valsk's unit effect - Any members of his formation get a free fusion blaster upgrade but cannot carry seeker missiles.

Charged wind attack - By rerouting the static charge that builds up on the hull as the craft flies to the weapons system they allowed to increase the weapons range. Adds 3" of range to Fusion Blaster attacks.

Circular Strafe attack - By understanding the winds the pilots have learned how to rotate their craft in such a way that the guns seem to always be pointed at just the right location on the enemy. All attacks are treated as if hitting rear armor.

Ride the wind - Years of flying in the worst conditions has allows them to fly at the lowest levels dodging terrain like it wasn't there. Vehicles gain the effects of having sensor spines and the ability to move up to 6" in the assault phase.

Soothing wind - By rolling and turning the craft into attacks they are able to deflect some of the damage from an attack lessening its impact on the craft. Vehicle no longer counts as open topped for all attack/damage rolls.

So what do you think? Having a special character like this would definitely freshen up some little used units and open up whole new tactical options. I can see a wing of 3 or 4 of these making life real difficult for whoever wants to go against it. For too long the Tau have relied on outdated static tactics. This puts that mobility back into the game while still fitting the character of a Mont'ka.

For the greater good!

Thursday, May 13, 2010

Fold Away Table part 3 - The Plan

I finally got some time to draw up the plans for the game table I built. The plans are just a guideline and not a finished set of working plans. For those that don't understand what I am talking about here is the quick rundown. Lumber is sold in different dimensions, 2x4 ,1x3, 10x2. Those numbers are not the actual sizes of the lumber you are buying. A 2x4 is not 2 inches by 4 inches it is actually 1/4 inch smaller. With this in mind adjust your cuts accordingly. Also I don't include any of the hardware for building the table. So things like angle brackets, hinges and  wheels are not shown in the diagrams. What is there is enough information so you can build your own version of the table. Like most projects this is where your on creativity comes in. At 36 inches tall it is a little short so making it 38 or more would be one thing to change. The same thing with the joints on the various parts. They are all shown as butt joints. These are pretty weak and can easily be changed to stronger joint depending on your woodworking skill level and tools.

So now you have a guideline lets see some tables.


If you are really serious about building one I do have the Visio files for the design. Just post a comment and let me know if you want me to post them as well.

Wednesday, May 12, 2010

Book Review: Courage and Honor


This is the 5th book in the continuing story of Uriel Ventus of the 4th company Ultramarines. This time around he has been called back into duty after being banished and redeemed for going against the Codex Astartes. This is his first mission and a proving ground for his worth as a Ultramarine. The story takes place on Pavonis, a planet we are introduced to in the first book in the series Nightbringer. The world is in a rebuilding state after the previous encounter and is being watched or rather occupied but Imperial forces. This sets up a bit of political tension between the local government and the military presence sent to stabilize it.

The story is driven in three different directions at the beginning with them all coming together at the end. The first is Uriel's return to command and whether he will be accepted after fallen so far. Second the political battle of a commerce driven world against the theocracy of the Imperium and lastly the struggle to rebuild a world ravaged by a civil war. The final is of course the battle with their ultimate enemy the Tau. The story about Uriel's reaffirmation give you a good behind the scenes look at the life of a space and what they go through in the name of honor. This includes scenes of life on Macragge and the history that space marines live in and with. You get to see some of the tension between the various commanders and chaplains that goes along with rebuilding trust in Uriel. This is fleshed out pretty well though if you were expecting the type of character study you got in Salamander you will be disappointed. This is partly due to this being the 5th story and the assumption the reader knows Uriel's history. Either way it does fit the book and progresses the story.

The political battle of the world is what actually sets up the actual battle with the Tau. In this case you have a failing government that is trying to hold on long enough to rebuild and as part of this rebuild they need to find a new source of revenue, any source. This is a commerce planet after all and a hub for trade. This position doesn't fit the typical Emperor fearing, xenophobic, eternal war that the Imperium likes. You have a great story line here that poses many questions such as what is the best way to rebuild a fallen world, by fire and brimstone or through diplomacy. There is a thread of how to rebuild the local PDF and police forces. Lastly you have the contrast in styles between the PDF and off world troops and how they look at each other.

The real meat of the book is the battle with the Tau. This reads like an IG book more than a space marine book. This is mainly due to the Tau fighting style of a disciplined attack that makes it a little harder for marines to shine. They get their moments in battle and some of the battles are incredible with close combat and the blood soaked, shot 3 times but still able to fight way marines are known for. There are a few points thought that mar the book by having just the perfect feature or item appear when needed. Sort of like Batman's belt in the 60's TV show having bottle of shark repellent. This happens late in the book though so it can be somewhat overlooked due to time.

The book is good and if you are an Ultramarines fan you will love it. Graham does a great job here but he feels rushed towards the end. It almost felt like they left a chapter out or made parts of the final battles easier to speed things up. This is mostly true of the pursuit into enemy territory section. The ending feels a little clipped as well but strangely fits the Tau in conservation of motion kind of way.

Final rating: Split 2+ / 4+ with a reroll
If you have read the other books in the series or are a Ultramarine fan I give it a 2+. It is a solid story and as a fan you can easily overlook the silly parts, brain eating, and get to the meat of the story.
If this is your first taste of Uriel and his brother it may be a little inside baseball and have you scratching your head from time to time. There are a few characters that reoccur from other books so you may miss small details. The story does still hold up though and that is what gives it a reroll.

Thursday, May 6, 2010

Product Review: GFM/Digital Concepts Portable Lighting Studio PS-101

This is a repost of a review I did a couple of years ago but it is still worth checking out for all the painters out there wanting to show off their works. Read it and let me know what you think.


The review starts....NOW!

You just finished it. Hours modding, weeks blending and shading colors for that lifelike look and waiting for the perfect conditions to finally seal the model it is time to show it off. You grab your camera, plop the mini down and begin snapping away only to see all the detail wash away with each click of the shutter. Wouldn't it be nice if you had some sort of photo box to put the model in that would show off all your hard work. You need a light box.


You have a couple of options for light boxes you can either build it or buy it. Building one is simple, grab a box, some white fabric and go to work. One small problem, where do you store it when you are done? So next option, buy one. For this we go to GFM PS-101. The PS-101 is a small portable light box for product photography. It is a complete kit with everything you need to get started. This is great for two reasons. First you get everything in one box so no running around for parts when you want to use it and second the kit is small and stores flat. Really small and really flat, it is 17"x17"x4". At this size it can easily fit anywhere and can travel with you for those trips the game store, event or friends' house.

What is in the Box?
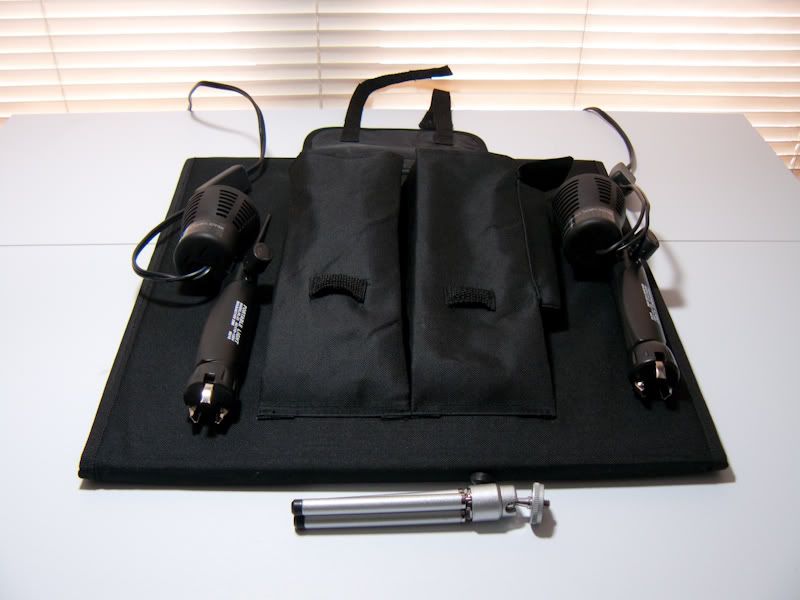
The kit includes a mini tripod, 2 20 watt lights, a reversible blue/gray backdrop and the convertible light box that is also the carrying case. Setup is simple as the box itself is held together using Velcro tabs and only took a few seconds to setup. The lights use a built in tripod but do not support clamping to a table. The reversible backdrop is long enough to give a seamless endless backdrop effect. Lastly the tripod is small and includes a decent adjustable mount.

To test it out I grabbed my cameras and began to snap some pictures. The first thing I noticed was my seamless backdrop had a crease in it that would show up on any pictures I took. This was annoying but expected after all you have to make a few sacrifices to get make everything portable. No big deal though 30 seconds with a hot iron eliminated the crease and I was ready to shoot again. Since ironing out the crease hasn't returned even after being put away in storage for a week.

The light setup was equally easy. Pull the tripod legs out and plug them in. The lights are 20 watt halogen and are a little on the low side. At 20 watts they can have problems completely eliminating shadows so you really have to play with their placement. I ended up settling for a very tight setup to push the shadows away. This may cause problems with tall figures but for most troops this wasn't an issue. The sockets and wiring will handle higher wattage bulbs provided you keep an eye on their temperatures. I switched mine to 30 watt bulbs and can get a solid 20 minute run time before I need to shut them down to cool off.


Next is the mini tripod. First off it is full metal, not what you expect in a low end kit. Most mini tripods will use a metal mounting screw and plastic legs. Being metal I was a little more confident mounting my video camera and SLR to it. The tripod has a ball and set screw pivot that is pretty basic but holds firm. The one issue I did find it only sits at 1 height. This can be a problem if you are trying to get a models eye view. It would have been nice to have a 2 height option with the legs being able to go flat and only raise the camera an inch or so in addition to the 4 inch default height.


Lastly is the light box itself. It is suprisingly roomy. Shooting 16x9 I was able to see both edges of the backdrop. This wasn't an issue at 3x2 or 4x3 resolutions. Even still moving the camera in a couple of inches made a huge difference and I was able to shoot some fairly nice groups. I wouldn't try and shoot a 30 ork unit with it but a dozen or so will fit in a tight group.

Summary Report:

Good
    small package that is highly portable and easy to store
    2 lights included for easier shadow elimination
    metal mini tripod with a decent head
    reversible backdrop for better contrast

Bad
    20 watt bulbs a little small and require adjustments to eliminate shadows
    tripod only has 1 level making it hard to get that model's eye view shot
  
Improvement
    If I was going to improve the kit the first thing I would change is the tripod to either a shot bag style unit or a 2 position regular one. The shot bag is easier for beginners and gives the best compromise in shot height at just over the head of the average marine. Next I would look into adding higher wattage bulbs and possibly a third lamp to completely eliminate shadows. 20 watts is really the minimum for good shots but the higher wattage will make a huge difference in the photos and allow you to more options for light placement.
  
Overall it is a pretty good kit and a way to improve your shooting. There is room for improvement but out of the box it is very functional.

On the 40k beer scale I would give it 1.5 beers to make me buy it. So back to the bar.

Sample Shot - Lights on
Sample Shot - Light off


Digital Concepts PS-101 Portable Lighting Studio $39.95
(http://www.amazon.com/Digital-Concepts-Ps-101-Portable-Lighting/dp/B000FBF400)

Tuesday, May 4, 2010

Converting and Casting Parts

Besides railguns there is no more useful weapon in Tau armies other than the missile pod/smart missile system. It is the greatest all around weapon in the arsenal. It is also one of the more comical looking. The problem isn't big but something about the round domes of the rockets feels like the sculptor was overridden when the final mold was made. They also feel a little small when you look at other missile and rocket pods used in the game.

Getting over this for most users is pretty simple you just grab a guard or marine part and glue it on. This works but just feels a little off to me. So I went on the hunt for an alternative and think I found it with these. They are the perfect base I was thinking. A little hunting at my local hobby store and I was able to acquire the necessary kit.

The kit included open and closed versions of the weapon pods which is great. All that was left was to make a base mold and begin casting. The mold turned out surprisingly well and picked up all the details. Now I just need to make final modifications to make it look at home on my battlesuits. As they are now though they look pretty good. I am thinking about magnetizing the missile section so I can have them open or closed for a little variety.


The full gallery - http://picasaweb.google.com/lathanm2501/Blog?feat=directlink

Monday, May 3, 2010

Fold Away Table part 2 - The base

I decided to put on my Bob the Builder hat and put together the base for the table today. Orginally I was going to copy the design of the cutting table but decided against it for a couple of reasons. First there was no easy way to add under table storage. Second my chop saw died, this meant that I couldn't do the half lap joints I was wanting to make the thing rock solid. Fear not this is not the end of the project, just a chance for me to get creative.

The bulk of the center section is made form a 1x12" board and 1x3" support rails. I used the thicker 1x3" to give the feet a little more strength. There will be allot of twisting forces on these parts as it is rolled around and the last thing I want to deal with is broken parts. The wheels are plastic locking casters that swivel so movement should be easy. Don't skimp when you do this yourself and skip the locking casters unless you want o be chasing your table down in the middle of a game.

The next part turned out to be the hardest, building the side supports. Thanks to the demise of my do everything chop saw, I had to fall back to my jig say to cut the parts. At first I tried cutting half lap joints with it and found it, lacking. So another trip to the hardware store was in order. Since purchasing another saw as not a wife friendly option, I went with angle brackets and a bunch of clamps. Several hours later I had a pair of working side supports. Someday I will post the full design but for now take a look at the pictures and see if you can figure it out.


LinkWithin

Related Posts with Thumbnails